


Fast & Free Shipping
Free shipping in 3-7 days on all orders.
Your order is eligible for free shipping!
There's no item in your cart.
You May Also Like
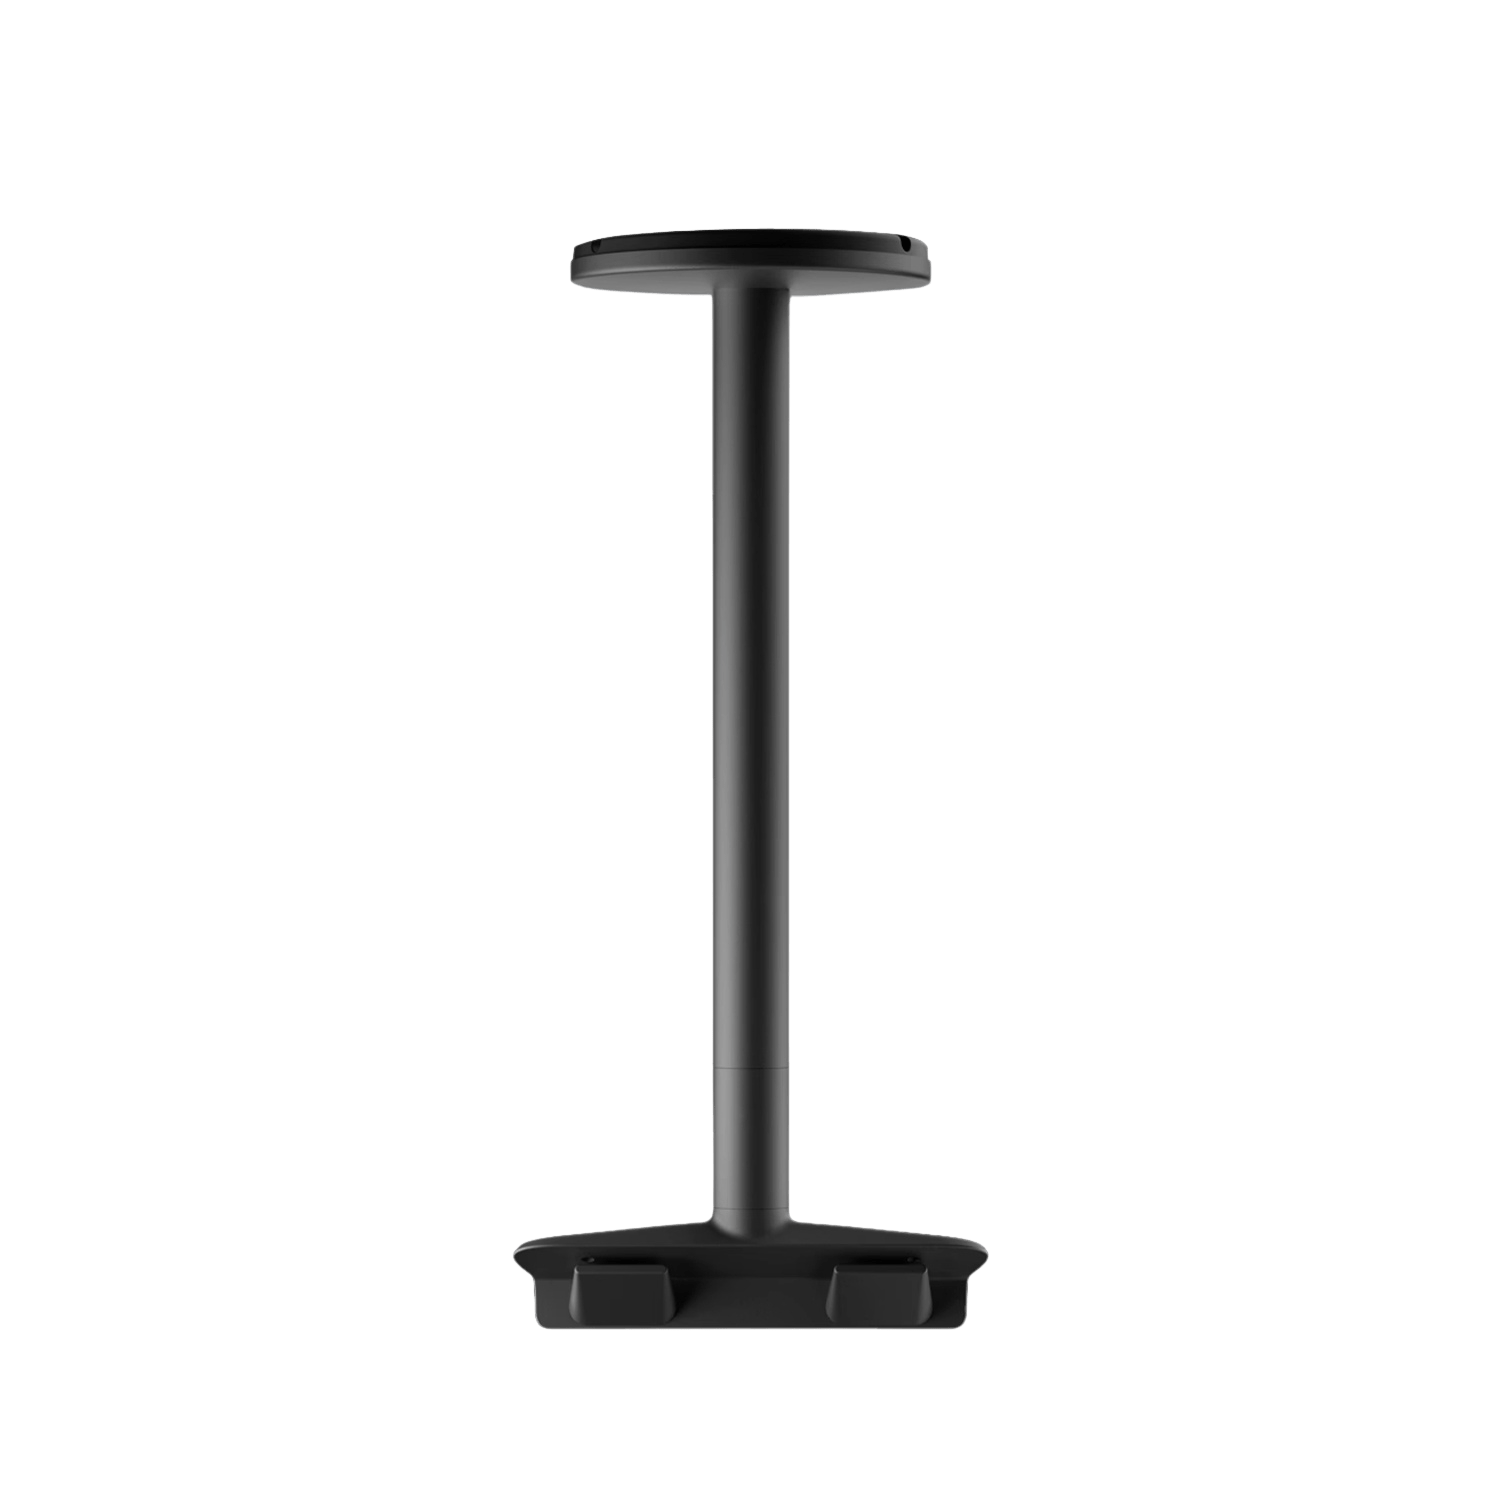
JMGO Ceiling Mount for Projector Bracket
$139.99
You're Saving $0.00
Shipping, taxes, and discount codes calculated at checkout.

Cinema, Perfected at Home


Take the Cinema Outside


Play Bigger. React Faster

Free shipping in 3-7 days on all orders.

Split your purchase into 4 easy payments with 0% interest (Support Klarna, Paypal and Afterpay).

Enjoy exclusive offers, seasonal campaigns, and special activities every month.

Comprehensive warranty protection on all purchase.

Retun within 30 days for a full refund.

Need help? Our expert support team is available 24/7 to assist you anytime, anywhere.

Free shipping in 3-7 days on all orders.

Split your purchase into 4 easy payments with 0% interest (Support Klarna, Paypal and Afterpay).

Enjoy exclusive offers, seasonal campaigns, and special activities every month.

Need help? Our expert support team is available 24/7 to assist you anytime, anywhere.

Comprehensive warranty protection on all purchase.

Retun within 30 days for a full refund.

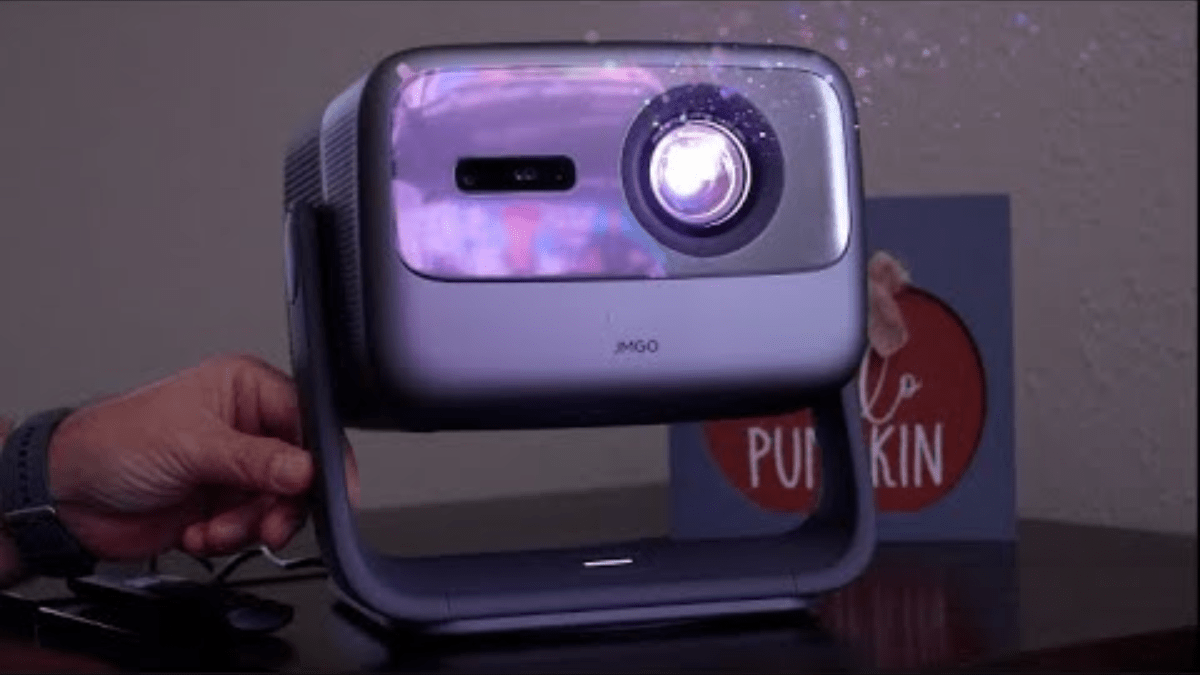
Experience the next level of projection—MALC™ 2.0 RGB Pure Triple Laser delivers richer colors, sharper clarity, and a 110% BT.2020 color gamut. It’s not just brighter; it’s leagues beyond ordinary other triple laser light, traditional single-laser, mixed laser and LED-based projectors.
JMGO is the first to introduce an all-in-one algorithmic gimbal projector, delivering ultra-smooth angle adjustments—up to 135° vertically and 360° horizontally. Wherever you point, the picture follows—true freedom in projection.
Experience flawless visuals with instant auto-focus, keystone correction, and adaptive brightness. Smart technologies like obstacle avoidance, screen alignment, and wall color adaptation ensure a perfect fit in any space. Eye protection adds extra comfort and safety.
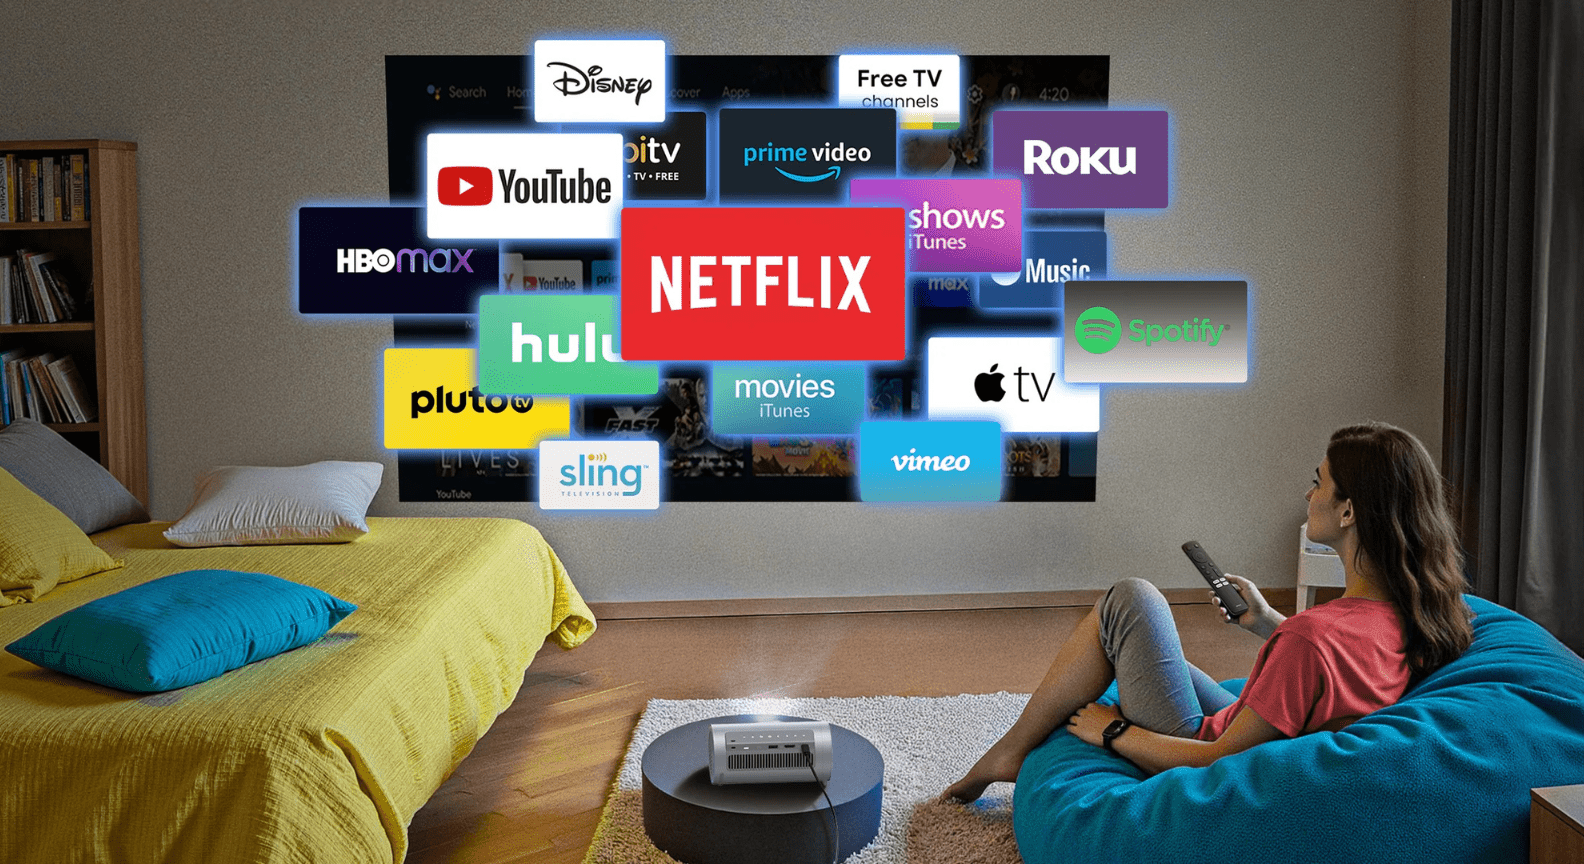
With certified Google TV, Netflix, and thousands of built-in apps, brings unlimited content from countless platforms, giving you entertainment anytime. anywhere.


Experience the next level of projection—MALC™ 2.0 RGB Pure Triple Laser delivers richer colors, sharper clarity, and a 110% BT.2020 color gamut. It’s not just brighter; it’s leagues beyond ordinary other triple laser light, traditional single-laser, mixed laser and LED-based projectors.
JMGO is the first to introduce an all-in-one algorithmic gimbal projector, delivering ultra-smooth angle adjustments—up to 135° vertically and 360° horizontally. Wherever you point, the picture follows—true freedom in projection.

Experience flawless visuals with instant auto-focus, keystone correction, and adaptive brightness. Smart technologies like obstacle avoidance, screen alignment, and wall color adaptation ensure a perfect fit in any space. Eye protection adds extra comfort and safety.
With certified Google TV, Netflix, and thousands of built-in apps, brings unlimited content from countless platforms, giving you entertainment anytime. anywhere.
Established in 2011, JMGO is a leader in the smart projector field. For over a decade, we've been at the forefront of optical technology research and development.
Established in 2011, JMGO is a leader in the smart projector field. For over a decade, we've been at the forefront of optical technology research and development.


The JMGO N1S Ultimate delivers stunning 4K visuals with rich colors and contrast, combined with smart features that make setup quick and effortless.
Learn More

The JMGO N3 Ultra Max is a smart 4K laser projector with auto-adjusting gimbal and built-in Google TV, set to launch globally in late 2025.
Learn More

The JMGO N1S Ultimate, unveiled at IFA 2024, combines powerful laser brightness ( 3300 ISO Lumens) with smart features to rival traditional TVs.
Learn MoreWhat the Experts Say

“My favorite projector from last year, the JMGO N1 Ultra, is set to receive an upgrade at IFA 2024 in Berlin. The JMGO N1S Ultimate is the company’s new flagship projector, offering similar smart features, the same brilliant design with a built-in gimbal system, and more.”
“My favorite projector from last year, the JMGO N1 Ultra, is set to receive an upgrade at IFA 2024 in Berlin. The JMGO N1S Ultimate is the company’s new flagship projector, offering similar smart features, the same brilliant design with a built-in gimbal system, and more.”

“The JMGO N1S Ultimate is a new projector with quite high brightness and 4K resolution. The model comes with smart functions and is therefore not dependent on an external player. The stand is not the only thing that makes it easy to set up.”
“The JMGO N1S Ultimate is a new projector with quite high brightness and 4K resolution. The model comes with smart functions and is therefore not dependent on an external player. The stand is not the only thing that makes it easy to set up.”

“The JMGO N1S Ultimate sits on a gimbal stand for placement flexibility, with its Multi Adaptive System adjusting visuals for easy setup JMGO”
“The JMGO N1S Ultimate sits on a gimbal stand for placement flexibility, with its Multi Adaptive System adjusting visuals for easy setup JMGO”
“With 3,500 ANSI lumens in its arsenal, you can't help but feel it's bright enough to project a movie directly onto the sun. It's certainly what you need if you plan on doing any projection outdoors in the daytime.”
“With 3,500 ANSI lumens in its arsenal, you can't help but feel it's bright enough to project a movie directly onto the sun. It's certainly what you need if you plan on doing any projection outdoors in the daytime.”
“The JMGO N1S Ultimate 4K boosts its usefulness with Google TV and official Netflix. Its 3500-lumens brightness means it can work practically anywhere, while making the most of HDR content, delivering bright, richly coloured scenes.”
“The JMGO N1S Ultimate 4K boosts its usefulness with Google TV and official Netflix. Its 3500-lumens brightness means it can work practically anywhere, while making the most of HDR content, delivering bright, richly coloured scenes.”
Looking for the best TV for gaming? A gaming projector offers 4K visuals, low input lag, and a massive screen for an unbeatable experience.
Read more
With streaming becoming the primary form of entertainment consumption, the selected device for streaming makes all the difference in the viewing experience. Two of the leading candidates in streaming services are Google TV and Roku, two platforms that offer effortless integration of hundreds of apps and services such as Netflix, Hulu, Disney+, and many others. But which one is more convenient for you? This article will analyze the main differences between Google TV and Roku to determine which device is more suitable for your home entertainment system. What Is Google TV? Google TV is an Android TV interface developed by Google and its various services. It helps to combine all the streaming services and apps in one easy-to-use layout and makes suggestions for users based on what they have enjoyed previously. Google TV can be found on products such as the Chromecast with Google TV as well as many smart television brands such as Sony and TCL. What Is Roku? Roku is a preferred streaming device platform due to its ease of use and many available streaming channels. Available Roku devices include reasonably priced streaming sticks and more advanced streaming boxes. RoKu also has Roku TVs, where the Roku platform is embedded into the television’s interface. Having existed for quite some time in the streaming device market, Roku is considered by most people to be one of the easiest-to-use platforms. Interface and Usability: Google TV vs Roku The user interface is an important factor in streaming devices, directly affecting the viewing experience. Let's compare Google TV and Roku in this regard. Google TV Interface The Google TV interface is efficient, contemporary, and editable to fit the user's preferences. It takes a content-first approach in that, rather than just showing you a list of apps, it collects all the content of all the streaming services the user subscribes to and displays it only. Some key features include: Content Discovery: Google TV incorporates artificial intelligence to recommend content based on the user's viewing patterns. It makes suggestions depending on content viewed from a variety of sources. Voice Search: The voice search option allows the user to find a show or a film – or even control his/her smart home appliances with the assistance of Google Assistant. Google Integration: For those who have already embraced the essential Google services, it will be easy to appreciate how Google Home integrates with Google TV, YouTube, Google Photos, and Google Home devices. While the interface can be a bit overwhelming for some due to the sheer amount of content and recommendations, it’s ideal for viewers who want to discover new shows or movies easily. Roku Interface Roku's popularity can be attributed to its intuitive interface and ease of use. Unlike other platforms, which will suggest numerous titles to users, the Roku platform adopts a simple design where only installed applications are displayed on a grid. For instance, even though there are various shows across Netflix, Hulu, Amazon, and Prime Video, users can easily switch between these platforms without any disturbance. Some key features include: Simplicity: The no-frills design makes Roku one of the easiest platforms to navigate, especially for less tech-savvy users. Customization: Roku allows you to arrange your apps in whatever order you prefer, giving you more control over the interface's appearance. Private Listening: Many Roku devices offer private listening, which allows you to listen to content using headphones connected to the Roku remote or via the Roku mobile app. Roku's straightforward layout is perfect for users who prioritize simplicity and ease of use over flashy interfaces or heavy personalization. Content and App Availability: Which Has More? One of the most important factors to consider is the number of apps and services available on each platform. Both Google TV and Roku, however, allow access to all the major streaming services. There are a few differences that can be pointed out. Google TV Content Google TV provides access to over 10,000 apps via the Google Play Store. This includes all the popular streaming services like Netflix, Disney+, HBO Max, and Amazon Prime Video, as well as niche platforms like Shudder, Crunchyroll, and many more. The core advantage of Google TV is its integration and use of Google Play Movies & TV, which allows users to rent or purchase a movie via the platform itself. In addition, YouTube is also well integrated, enabling users to search and view their favorite videos without exiting the interface. Roku Content Roku has one of the most extensive app libraries in the streaming world, offering over 20,000 channels. Like Google TV, Roku supports all major streaming platforms, including Netflix, Hulu, Disney+, and Apple TV. To enhance the value of the platform further, Roku has introduced The Roku Channel, a free streaming service that is replete with movies, television shows, and live news. Though it is not as integrated into the platform as Google TV, the happenings and uploading of thousands of other niche channels akin to the provision of Roku makes sense for everyone. In terms of sheer app availability, Roku takes the edge. On the other hand, incorporating Google services and Android applications within the framework of Google TV offers an additional advantage to those who already belong to the Google family. Remember, choose the best option that will give you the full experience; a good example is the JMGO N1S Pro 4k, which is compatible with both Google TVs. Smart Features and Voice Control: Google TV vs Roku As smart features become more important in home entertainment, it’s worth comparing what each platform offers in terms of voice control and smart home integration. Google TV Smart Features With Google TV, one can get extensive device voice control through Google Assistant. One can do a content search, control the volume, and even issue commands for compatible smart home devices using voice. Also, Google Assistant should provide information on the weather or traffic and similar interactivity with the TV. Besides that, Google TV comes with Chromecast support, allowing users to cast the content to their TV screen from smart devices such as their phone, tablet, or laptop. If you are fully enmeshed within the walls of the Google ecosystem, the built-in features and ability to control it via Google TV are quite pleasing. Roku Smart Features Roku might not have Google TV's smart home integration capabilities, but it has voice search features integrated into its devices. Users with supported Roku devices can use their voice to find content, open applications, and even control the playback of their devices with the Roku remote or the Roku mobile app. Although Roku's smart features are not as advanced as those of Google TV, the platform still offers basic voice control for users who need that functionality. Which Is Best for You? Choosing the best option between Google TV and Roku depends on your preferences and needs. In case you desire a content-first approach with a heavily personalized interface integrated within the google ecosystem, Google TV would be the best option. If you value simplicity, affordability, and access to a massive library of streaming channels, Roku might be more up your alley. Ultimately, both platforms guarantee excellent streaming services, but the selection will depend on whether you like the sophistication of Google TV or Roku's simplicity and variety. Visit us at JMGO or contact us to get the best option for your home!
Read more
Sep 24, 2025
Choosing the Right Projector: Triple Laser vs Other Light Sources When creating a captivating home theater experience, picking the right projector is key. With so many options—traditional lamp, LED, non-triple laser, and triple laser projectors—deciding can be overwhelming. Here’s a straightforward guide to help you choose. Traditional Lamp Projectors Pros: Affordable, widely available, good color reproductionCons: Bulbs need frequent replacement, shorter lifespan, less energy-efficient LED Projectors Pros: Long lifespan, energy-efficient, compact and portableCons: Lower brightness, not ideal for large screens or bright rooms Non-Triple Laser Projectors (Single, Dual, Hybrid) Pros: High brightness, good color accuracy, long lifespanCons: Limited color gamut, possible color imbalance, higher cost than lamps or LEDs Triple Laser Projectors (RGB) Pros: Exceptional color accuracy, wide color gamut (up to 100% BT.2020), high brightness, long-lasting, minimal maintenanceCons: Higher initial cost, may need precise setup Key Comparisons Brightness & Image Quality: Triple lasers excel in both dark and bright rooms. Lifespan & Maintenance: Triple lasers last longer with almost no upkeep. Portability: LEDs are lighter and more portable; triple lasers suit dedicated setups. Cost: Triple lasers have a higher upfront price, but long-term value offsets it. Who Should Choose Triple Laser? Home Theater Enthusiasts: For a cinema-like experience with vibrant colors and stunning clarity. Examples: JMGO N1S Ultimate, Hisense PX3-Pro. Casual Users: Portable triple laser projectors offer richer colors than LEDs. Example: JMGO N1S 4K Mini. Business & Education: High brightness and reliability for classrooms or meeting rooms. Example: JMGO N1S Pro 4K. Conclusion Triple laser projectors offer top-tier image quality and longevity, ideal for those seeking the ultimate viewing experience. LED and lamp projectors remain practical for cost-conscious or portable needs. Understanding each type helps you choose the projector that best fits your lifestyle and environment.
Read more
Projectors that fit your pocket have transformed the way we consume content and share it with others. These small machines provide a powerful yet flexible way of exhibiting pictures and films in diverse environments. They are compact and light in weight, making them ideal for events at home or even in the office, as well as family movie nights. This guideline, therefore, will analyze different features related to mini portable projectors to help users identify a suitable model and utilize its functions optimally. What Sets Mini Portable Projectors Apart? Mini portable projectors are distinguished by their small sizes and portability. Unlike traditional projectors that can be bulky and take a lot of time to set up, mini portable projectors are designed to be easy to carry and lightweight. This is why they are perfect for users who require flexibility on where and how they use projectors. Many of these projectors, however, provide remarkable image quality even though they are compact. Still, at the same time, they come with numerous advanced features, making them suitable for various purposes. How Mini Portable Projectors Work? Mini portable projectors utilize various light sources when displaying images on a screen or wall. Some of the most frequently used technologies include LED and Laser. While most LED projectors last longer and consume less energy, laser projectors tend to produce brighter pictures with more vivid colors. Moreover, they come with built-in speakers and many connectivity options that render them more flexible and easy to handle. Key Considerations for Choosing a Mini Portable Projector Image Quality Selecting a mini portable projector requires you to remember one of the most important factors: image quality. For precise and sharp images, look for projectors with high resolution. You can find resolutions such as 720p (HD) or 1080p (Full HD) on the market, which provide excellent picture quality for most households. Some premium models even come in 4K resolution for those who want pure clarity and detail. The projector’s resolution must match your preferences so that you can have distinct and intricate visuals. Brightness and Contrast Brightness is measured in lumens and shows how a projector performs in different lighting situations. Usually, projectors with 1500 to 3000 lumens suffice for home theaters or presentations done in less luminous rooms. Conversely, if one plans to use the projector in areas with more light, he/she might require one that has a higher luminosity degree. Furthermore, the contrast ratio influences the clarity of an image, especially when distinguishing dark and light spots from each other. Thus, it plays a critical role as it enhances picture depth and detail, bringing about an appealing watching background. Battery Life and Portability Battery life is an important factor to consider when using the projector without any power outlet. Many miniature portable projectors have a battery life of 1.5 to 3 hours when fully charged. For prolonged usage, a projector with longer battery life or the capability to be connected to external power supplies could be considered. The size and weight of the projector are also factors affecting portability. Choose one that compromises transportability and features so you can easily slip it into your backpack or suitcase comfortably. Connectivity Options Connectivity options are determined by the available ports or options that facilitate connection to different gadgets. Some of the most frequent alternatives are HDMI, USB, and wireless forms like Bluetooth or Wi-Fi. HDMI is commonly used to connect a laptop, Blu-ray player, or game console, whereas USB is suitable for viewing files directly from a flash disk. It also allows one to stream content on a wireless connection and mirror the screen of one’s device without any physical wires involved, making wireless choices more advantageous. You must ensure that your preferred projector can accept all required connections for your devices and purposes. How to Set Up and Use Your Mini Portable Projector Find the Right Spot: To achieve the highest quality image; one should carefully select projector placement. Ideally, the area should be flat and smooth to ensure the projection is clear. A portable screen or wall can be used as the surface for projection. In case the wall has to be projected on, make sure it is white or light-colored, as well as free from any blemishes that could distort the picture in any manner whatsoever. Always use your projector when its surrounding lighting level is low so that the sharpness and liveliness of the projected image are enhanced. Adjust Position and Focus: Based on the projector's specifications, position the projector at the correct distance from the screen or wall. Most projectors have a focus ring that allows you to adjust the sharpness of the image. Use this feature to ensure that the image is crisp and clear. Many mini portable projectors, like the JMGO 1, also offer keystone correction, which helps adjust any distortion caused by the projector being placed at an angle. Proper alignment and positioning are crucial for a well-projected image. Connect Your Devices: Connecting your devices to the projector is straightforward. Use the appropriate cables or wireless methods to link your projector with devices such as laptops, tablets, or streaming devices. Ensure all connections are secure and the projector is set to the correct input source. For an enhanced audio experience, consider connecting external speakers if your projector’s built-in speakers are insufficient. Configure Settings: Check out this manual for more information on how to connect everything properly. Next, change the projector's settings to your liking and the location of the watching (home). In another case, change brightness levels, contrast ratios, and colors depending on what you have in your room. You can also adjust the dimensions of your picture to ensure that it fits well within its boundaries without cutting any parts out or being misrepresented through stretching. If you make specific changes to these optional features, your satisfaction with a film will certainly increase. Tips for Maximizing Your Mini Portable Projector Experience Enhance Audio Quality: Most mini portable projectors have inbuilt speakers, but it is always better to connect to external ones for better sound. This is very important in movie nights or presentations where sound needs to be clear and impactful. External speakers can create a deeper bass sound, enhancing the overall experience. Keep Your Projector Maintained: Regular upkeep of one’s projector is necessary to remain effective throughout its life span. It is essential to routinely clean the projector's lens so that dust particles or dirt can be removed, bothering with crystal clear graphics and picture display. Furthermore, check and clean air filters installed within the device where relevant. However, adherence to manufacturer directions on maintaining projectors should always be maintained so they work perfectly well. Use in Various Settings: The versatility of mini portable projectors is one of their greatest assets. Outdoor gatherings, small meeting rooms, and a wide variety of other settings are some examples of places where these devices may be put to good use. People are encouraged to benefit from their portability because they can be used for different occasions and in various locations. Because of this flexibility, they can be a valuable tool in many other things. Explore Advanced Features: Many mini portable projectors have advanced functionalities that make their use efficient. Most of these include in-built media players, helpful applications, or direct-source streaming from the web. When one looks into these additional functions in detail, it is possible to get the maximum advantage out of such gadgets, thus enjoying them for reasons other than simply projecting. Final Thought Portable mini projectors are a flexible and handy choice for projecting images or videos; hence, they are suitable for different applications. To achieve an enhanced viewing experience, it is vital to understand some of their key features and follow suitable setting tips. Choosing the right model and adequately maintaining it will ensure that you reap maximum benefits from your investment regardless of whether you use it for professional purposes, leisure, or travel. You can enjoy impressive visuals wherever you go with the right mini portable projector, such as the JMGO 1.
Read more

Discover how Dolby Vision enhances your viewing experience with brighter colors, deeper blacks, and lifelike details. Ready to upgrade your home entertainment? Explore JMGO’s 4K projectors today!
Read more
Looking for the best TV for gaming? A gaming projector offers 4K visuals, low input lag, and a massive screen for an unbeatable experience.
Read more
With streaming becoming the primary form of entertainment consumption, the selected device for streaming makes all the difference in the viewing experience. Two of the leading candidates in streaming services are Google TV and Roku, two platforms that offer effortless integration of hundreds of apps and services such as Netflix, Hulu, Disney+, and many others. But which one is more convenient for you? This article will analyze the main differences between Google TV and Roku to determine which device is more suitable for your home entertainment system. What Is Google TV? Google TV is an Android TV interface developed by Google and its various services. It helps to combine all the streaming services and apps in one easy-to-use layout and makes suggestions for users based on what they have enjoyed previously. Google TV can be found on products such as the Chromecast with Google TV as well as many smart television brands such as Sony and TCL. What Is Roku? Roku is a preferred streaming device platform due to its ease of use and many available streaming channels. Available Roku devices include reasonably priced streaming sticks and more advanced streaming boxes. RoKu also has Roku TVs, where the Roku platform is embedded into the television’s interface. Having existed for quite some time in the streaming device market, Roku is considered by most people to be one of the easiest-to-use platforms. Interface and Usability: Google TV vs Roku The user interface is an important factor in streaming devices, directly affecting the viewing experience. Let's compare Google TV and Roku in this regard. Google TV Interface The Google TV interface is efficient, contemporary, and editable to fit the user's preferences. It takes a content-first approach in that, rather than just showing you a list of apps, it collects all the content of all the streaming services the user subscribes to and displays it only. Some key features include: Content Discovery: Google TV incorporates artificial intelligence to recommend content based on the user's viewing patterns. It makes suggestions depending on content viewed from a variety of sources. Voice Search: The voice search option allows the user to find a show or a film – or even control his/her smart home appliances with the assistance of Google Assistant. Google Integration: For those who have already embraced the essential Google services, it will be easy to appreciate how Google Home integrates with Google TV, YouTube, Google Photos, and Google Home devices. While the interface can be a bit overwhelming for some due to the sheer amount of content and recommendations, it’s ideal for viewers who want to discover new shows or movies easily. Roku Interface Roku's popularity can be attributed to its intuitive interface and ease of use. Unlike other platforms, which will suggest numerous titles to users, the Roku platform adopts a simple design where only installed applications are displayed on a grid. For instance, even though there are various shows across Netflix, Hulu, Amazon, and Prime Video, users can easily switch between these platforms without any disturbance. Some key features include: Simplicity: The no-frills design makes Roku one of the easiest platforms to navigate, especially for less tech-savvy users. Customization: Roku allows you to arrange your apps in whatever order you prefer, giving you more control over the interface's appearance. Private Listening: Many Roku devices offer private listening, which allows you to listen to content using headphones connected to the Roku remote or via the Roku mobile app. Roku's straightforward layout is perfect for users who prioritize simplicity and ease of use over flashy interfaces or heavy personalization. Content and App Availability: Which Has More? One of the most important factors to consider is the number of apps and services available on each platform. Both Google TV and Roku, however, allow access to all the major streaming services. There are a few differences that can be pointed out. Google TV Content Google TV provides access to over 10,000 apps via the Google Play Store. This includes all the popular streaming services like Netflix, Disney+, HBO Max, and Amazon Prime Video, as well as niche platforms like Shudder, Crunchyroll, and many more. The core advantage of Google TV is its integration and use of Google Play Movies & TV, which allows users to rent or purchase a movie via the platform itself. In addition, YouTube is also well integrated, enabling users to search and view their favorite videos without exiting the interface. Roku Content Roku has one of the most extensive app libraries in the streaming world, offering over 20,000 channels. Like Google TV, Roku supports all major streaming platforms, including Netflix, Hulu, Disney+, and Apple TV. To enhance the value of the platform further, Roku has introduced The Roku Channel, a free streaming service that is replete with movies, television shows, and live news. Though it is not as integrated into the platform as Google TV, the happenings and uploading of thousands of other niche channels akin to the provision of Roku makes sense for everyone. In terms of sheer app availability, Roku takes the edge. On the other hand, incorporating Google services and Android applications within the framework of Google TV offers an additional advantage to those who already belong to the Google family. Remember, choose the best option that will give you the full experience; a good example is the JMGO N1S Pro 4k, which is compatible with both Google TVs. Smart Features and Voice Control: Google TV vs Roku As smart features become more important in home entertainment, it’s worth comparing what each platform offers in terms of voice control and smart home integration. Google TV Smart Features With Google TV, one can get extensive device voice control through Google Assistant. One can do a content search, control the volume, and even issue commands for compatible smart home devices using voice. Also, Google Assistant should provide information on the weather or traffic and similar interactivity with the TV. Besides that, Google TV comes with Chromecast support, allowing users to cast the content to their TV screen from smart devices such as their phone, tablet, or laptop. If you are fully enmeshed within the walls of the Google ecosystem, the built-in features and ability to control it via Google TV are quite pleasing. Roku Smart Features Roku might not have Google TV's smart home integration capabilities, but it has voice search features integrated into its devices. Users with supported Roku devices can use their voice to find content, open applications, and even control the playback of their devices with the Roku remote or the Roku mobile app. Although Roku's smart features are not as advanced as those of Google TV, the platform still offers basic voice control for users who need that functionality. Which Is Best for You? Choosing the best option between Google TV and Roku depends on your preferences and needs. In case you desire a content-first approach with a heavily personalized interface integrated within the google ecosystem, Google TV would be the best option. If you value simplicity, affordability, and access to a massive library of streaming channels, Roku might be more up your alley. Ultimately, both platforms guarantee excellent streaming services, but the selection will depend on whether you like the sophistication of Google TV or Roku's simplicity and variety. Visit us at JMGO or contact us to get the best option for your home!
Read more
Projectors that fit your pocket have transformed the way we consume content and share it with others. These small machines provide a powerful yet flexible way of exhibiting pictures and films in diverse environments. They are compact and light in weight, making them ideal for events at home or even in the office, as well as family movie nights. This guideline, therefore, will analyze different features related to mini portable projectors to help users identify a suitable model and utilize its functions optimally. What Sets Mini Portable Projectors Apart? Mini portable projectors are distinguished by their small sizes and portability. Unlike traditional projectors that can be bulky and take a lot of time to set up, mini portable projectors are designed to be easy to carry and lightweight. This is why they are perfect for users who require flexibility on where and how they use projectors. Many of these projectors, however, provide remarkable image quality even though they are compact. Still, at the same time, they come with numerous advanced features, making them suitable for various purposes. How Mini Portable Projectors Work? Mini portable projectors utilize various light sources when displaying images on a screen or wall. Some of the most frequently used technologies include LED and Laser. While most LED projectors last longer and consume less energy, laser projectors tend to produce brighter pictures with more vivid colors. Moreover, they come with built-in speakers and many connectivity options that render them more flexible and easy to handle. Key Considerations for Choosing a Mini Portable Projector Image Quality Selecting a mini portable projector requires you to remember one of the most important factors: image quality. For precise and sharp images, look for projectors with high resolution. You can find resolutions such as 720p (HD) or 1080p (Full HD) on the market, which provide excellent picture quality for most households. Some premium models even come in 4K resolution for those who want pure clarity and detail. The projector’s resolution must match your preferences so that you can have distinct and intricate visuals. Brightness and Contrast Brightness is measured in lumens and shows how a projector performs in different lighting situations. Usually, projectors with 1500 to 3000 lumens suffice for home theaters or presentations done in less luminous rooms. Conversely, if one plans to use the projector in areas with more light, he/she might require one that has a higher luminosity degree. Furthermore, the contrast ratio influences the clarity of an image, especially when distinguishing dark and light spots from each other. Thus, it plays a critical role as it enhances picture depth and detail, bringing about an appealing watching background. Battery Life and Portability Battery life is an important factor to consider when using the projector without any power outlet. Many miniature portable projectors have a battery life of 1.5 to 3 hours when fully charged. For prolonged usage, a projector with longer battery life or the capability to be connected to external power supplies could be considered. The size and weight of the projector are also factors affecting portability. Choose one that compromises transportability and features so you can easily slip it into your backpack or suitcase comfortably. Connectivity Options Connectivity options are determined by the available ports or options that facilitate connection to different gadgets. Some of the most frequent alternatives are HDMI, USB, and wireless forms like Bluetooth or Wi-Fi. HDMI is commonly used to connect a laptop, Blu-ray player, or game console, whereas USB is suitable for viewing files directly from a flash disk. It also allows one to stream content on a wireless connection and mirror the screen of one’s device without any physical wires involved, making wireless choices more advantageous. You must ensure that your preferred projector can accept all required connections for your devices and purposes. How to Set Up and Use Your Mini Portable Projector Find the Right Spot: To achieve the highest quality image; one should carefully select projector placement. Ideally, the area should be flat and smooth to ensure the projection is clear. A portable screen or wall can be used as the surface for projection. In case the wall has to be projected on, make sure it is white or light-colored, as well as free from any blemishes that could distort the picture in any manner whatsoever. Always use your projector when its surrounding lighting level is low so that the sharpness and liveliness of the projected image are enhanced. Adjust Position and Focus: Based on the projector's specifications, position the projector at the correct distance from the screen or wall. Most projectors have a focus ring that allows you to adjust the sharpness of the image. Use this feature to ensure that the image is crisp and clear. Many mini portable projectors, like the JMGO 1, also offer keystone correction, which helps adjust any distortion caused by the projector being placed at an angle. Proper alignment and positioning are crucial for a well-projected image. Connect Your Devices: Connecting your devices to the projector is straightforward. Use the appropriate cables or wireless methods to link your projector with devices such as laptops, tablets, or streaming devices. Ensure all connections are secure and the projector is set to the correct input source. For an enhanced audio experience, consider connecting external speakers if your projector’s built-in speakers are insufficient. Configure Settings: Check out this manual for more information on how to connect everything properly. Next, change the projector's settings to your liking and the location of the watching (home). In another case, change brightness levels, contrast ratios, and colors depending on what you have in your room. You can also adjust the dimensions of your picture to ensure that it fits well within its boundaries without cutting any parts out or being misrepresented through stretching. If you make specific changes to these optional features, your satisfaction with a film will certainly increase. Tips for Maximizing Your Mini Portable Projector Experience Enhance Audio Quality: Most mini portable projectors have inbuilt speakers, but it is always better to connect to external ones for better sound. This is very important in movie nights or presentations where sound needs to be clear and impactful. External speakers can create a deeper bass sound, enhancing the overall experience. Keep Your Projector Maintained: Regular upkeep of one’s projector is necessary to remain effective throughout its life span. It is essential to routinely clean the projector's lens so that dust particles or dirt can be removed, bothering with crystal clear graphics and picture display. Furthermore, check and clean air filters installed within the device where relevant. However, adherence to manufacturer directions on maintaining projectors should always be maintained so they work perfectly well. Use in Various Settings: The versatility of mini portable projectors is one of their greatest assets. Outdoor gatherings, small meeting rooms, and a wide variety of other settings are some examples of places where these devices may be put to good use. People are encouraged to benefit from their portability because they can be used for different occasions and in various locations. Because of this flexibility, they can be a valuable tool in many other things. Explore Advanced Features: Many mini portable projectors have advanced functionalities that make their use efficient. Most of these include in-built media players, helpful applications, or direct-source streaming from the web. When one looks into these additional functions in detail, it is possible to get the maximum advantage out of such gadgets, thus enjoying them for reasons other than simply projecting. Final Thought Portable mini projectors are a flexible and handy choice for projecting images or videos; hence, they are suitable for different applications. To achieve an enhanced viewing experience, it is vital to understand some of their key features and follow suitable setting tips. Choosing the right model and adequately maintaining it will ensure that you reap maximum benefits from your investment regardless of whether you use it for professional purposes, leisure, or travel. You can enjoy impressive visuals wherever you go with the right mini portable projector, such as the JMGO 1.
Read more
Discover how Dolby Vision enhances your viewing experience with brighter colors, deeper blacks, and lifelike details. Ready to upgrade your home entertainment? Explore JMGO’s 4K projectors today!
Read more


